
Safety Update
- gscalfaro
- Jan 10
- 5 min read
Integrating various detectors with the CRBO GX
No worries, I already have installed a Smoke Alarm and a CO and Propane detector in my van. While these all work great, I wanted to be able to track what alarm was going off if at all. So as devices were coming up on the EOL, I was looking to replace them with units with digital output capabilities. This way I could attach to the Digital Input Section of my Victron Cerbo GX. This would enable me to monitor the status of such detectors through Cerbo GX.
Smoke Detector
The first device was to move to a 12 Volt smoke detector, the device I found was a Wired Interlink Smoke Detector for 12v Normally Opened (NO) Alarm Systems OR without Alarm System - 12 Volt. This is a 12-volt detector that has an interconnect line that can be connected to other detectors. Of course, I only need one, but I was going to use an Icstation DC 12V Optocoupler Isolation Module EL817 1 Channel Opto PNP NPN Signal Converter, Isolator High-Level Trigger 80KHz between the interconnect and Cerbo Digital Input. This unit also supports both NC and NO relay output, so I could also use that. I should note that they also have a unit with just NO/NC relay output which is a couple of bucks cheaper.
After hooking up and figuring out the configuration parameters, I have decided to just use this with The Normally Connected outputs. The Normally Open output shares the interconnect output (12V) which I don’t want to hook to the Digital Input. The isolation module is technically neat, but it takes up more space and adds some complexity to the setup which I don’t think is needed. I will have to use the inverted option on the device setup.
CO Detector
For CO detector I purchased an Fireboy-Xintex Co Alarm 12/24v Dc W/Interconnect . This also has an interconnect line and a relay. I am looking to just wire the relay between the Digital Input line. The interconnect on these units is 3.5-volt output. In any event I just wired in the internal relay
Propane Detector
I purchased an Safe-T-Alert 25-742-R-BL-TR-KIT Carbon Monoxide/ LP Leak Detector Flush Mount , Trim Ring, Solenoid Valve. This also has a Carbon Monoxide detector, but I can no longer find the single device unit. Plus, I am OK with two Carbon Monoxide detectors. The other thing this package has is a solenoid for the propane line. Being that my propane tank is tucked up under the van I already have a switched solenoid valve for my tank. The dilemma here is to directly wire the relay control directly to the solenoid or to the digital input. I have chosen to wire directly to the Digital IO. Being that my RV status program runs 24/7 if I get the alarm for propane, I can shut off the propane solenoid with another software-controlled relay. The relay will be treated as normally connected also and will need to be inverted also. To test this relay on this I needed to use some Iso Butane to set it off. The test button just caused the alarms to go off; it also would not drive the relay with just CO alarm. Good thing I have a separate CO detector.

Configuration
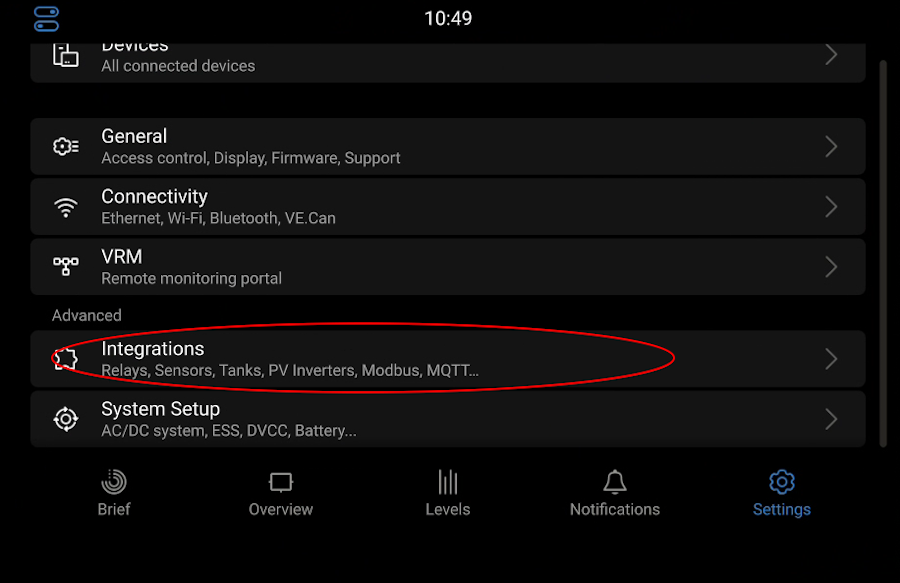
To configure the Digital, I/O. If you look at Settings>Integrations, you should see Digital I.O under Physical IO.

Go to the appropriated wired input Settings>Integrations>Digital inputs and choose the appropriate device for your intended purpose. After that it will show up under Settings>Devices

We can choose what type alarm it is.

After that we should be able to see the specific inputs show up under devices

The next screen will show us the Type of alarm that it is configured to be, and the State of the alarm. It will also give you a access to setup screen and device screen Under Settings>Devices>Smoke Alarm>Device will show the GPIO pin connected to, the actual product name, Product ID and VRM instance. The VRM instance will be important if you try to communicate with Modbus later.

The Name input will allow you to provide a custom name, this is where you can change CO2 to CO Alarm, or I used Fire Alarm and changed it to Propane Alarm.

In the Settings>Devices>Smoke Alarm> Setup screen we get to decide on the following inputs·
Enable Alarm: turning this on allows Cerbo to issue an alarm. The triggering event can now be pushed through the system.
Inverted: Can be used to match your sensors output. In my case the Smoke Detector I am using the Normally Connected output of the relay, I need the inverted setting to match up with that. Basically, we are swapping (Alarm and OK) state inputs
Inverted alarm logic: This pretty much goes hand in hand with the Inverted setting. Again, we are swapping (Alarm and No Alarm) alarm inputs
Cerbo Alarm Notification
The alarm notification comes in different ways. The first is on the GUI they splash a red bar over the display notifying you of the current alarm.

It also shows up in the Notification panel, you will eventually have to go there to silence.

On the VRM page Settings>Set Alarms you can configure automatic alarm monitoring. I currently have mine set to alarms only.

Under Preferences >Notifications you can configure alarms to be pushed via email, browser and phone.

I currently receive via email and phone


Integrating with my Transit Status Program
My first thought was to treat each alarm as an indicator. Then I could add to indicators on the mirror page. Being that there is not a lot of room left for new indicators, and that would only be visible on that page. I decided to emulate the same response that the Cerbo gives, a warning bar. This will pop to the front of any page that the program is currently on.

I also decided to add a page to just read the status and store information about product and replacement date. It was a good place for some setup options to handle the option of inverted status and inverted alarm logic. While those get inverted in the Cerbo, when reading via Modbus only the alarm logic is inverted. These options allow me to stay in sync.

I also added replacement date information and if you click on the Sensor photo you have access to the Sensor manual.

Of course, I still added an indicator to the driving default page, to let me know that the alarms were running OK


Comments